728x90
반응형
<?php
    // JSON (Javascript Object Notation)

    $array = Array (
        "0" => Array (
            "id" => "01",
            "space_name" => "Earth"
        ),
        "1" => Array (
            "id" => "02",
            "space_name" => "Mars"
        ),
        "2" => Array (
            "id" => "03",
            "space_name" => "Mercury"
        )
    );

    $json = json_encode($array);
    $bytes = file_put_contents("myfile.json", $json);
    echo "The number of bytes written are $bytes.";
?>
json파일을 만들면 아래와 같이 만들어집니다.
[{"id":"01","space_name":"Earth"},{"id":"02","space_name":"Mars"},{"id":"03","space_name":"Mercury"}]
이제 생성한 json파일을 불러온후에 array로 바꾼후에 html 파일로 예쁘게 생성해봅시다
<?php
$url = "myfile.json";
if(!file_exists($url)){
echo "파일이 없습니다";
exit;
}
$json_string = file_get_contents($url);
$R = json_decode($json_string, true);
echo "<pre>";
print_r($R);
echo "</pre>";
foreach($R as $row){
//echo $row["space_name"];
//echo "<br>";
}
?>
<body>
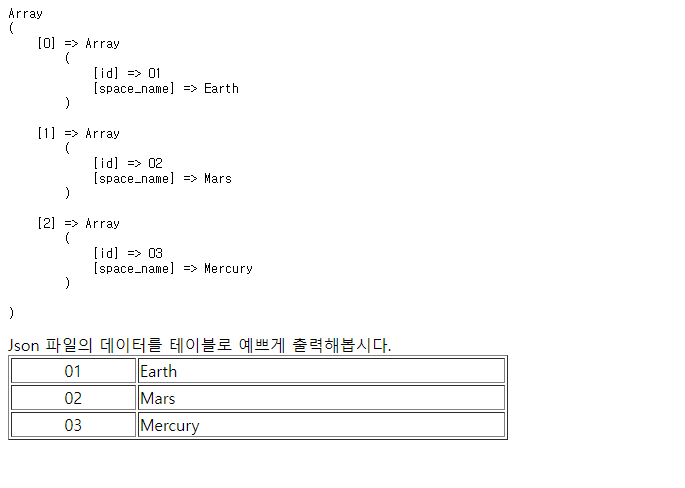
Json 파일의 데이터를 테이블로 예쁘게 출력해봅시다.<br>
<table border="1" width="500">
<?php
foreach($R as $row){
?>
<tr>
<td align="center"><?=$row["id"]?></td>
<td><?=$row["space_name"]?></td>
</tr>
<? } ?>
</table>
</body>
아래와 같은 결과값을 얻을 수 있습니다.
728x90
반응형
'IT > PHP' 카테고리의 다른 글
| windows) PHP8 xdebug 설치하기 및 VSCODE 연동하기 (0) | 2024.01.21 |
|---|---|
| 윈도우 Apache php버전 변경시의 httpd.conf 설정방법 (0) | 2024.01.20 |
| window에서 아파치.php,mysql,phpmyadmin 설치하는방법 (1) | 2024.01.13 |